Background:
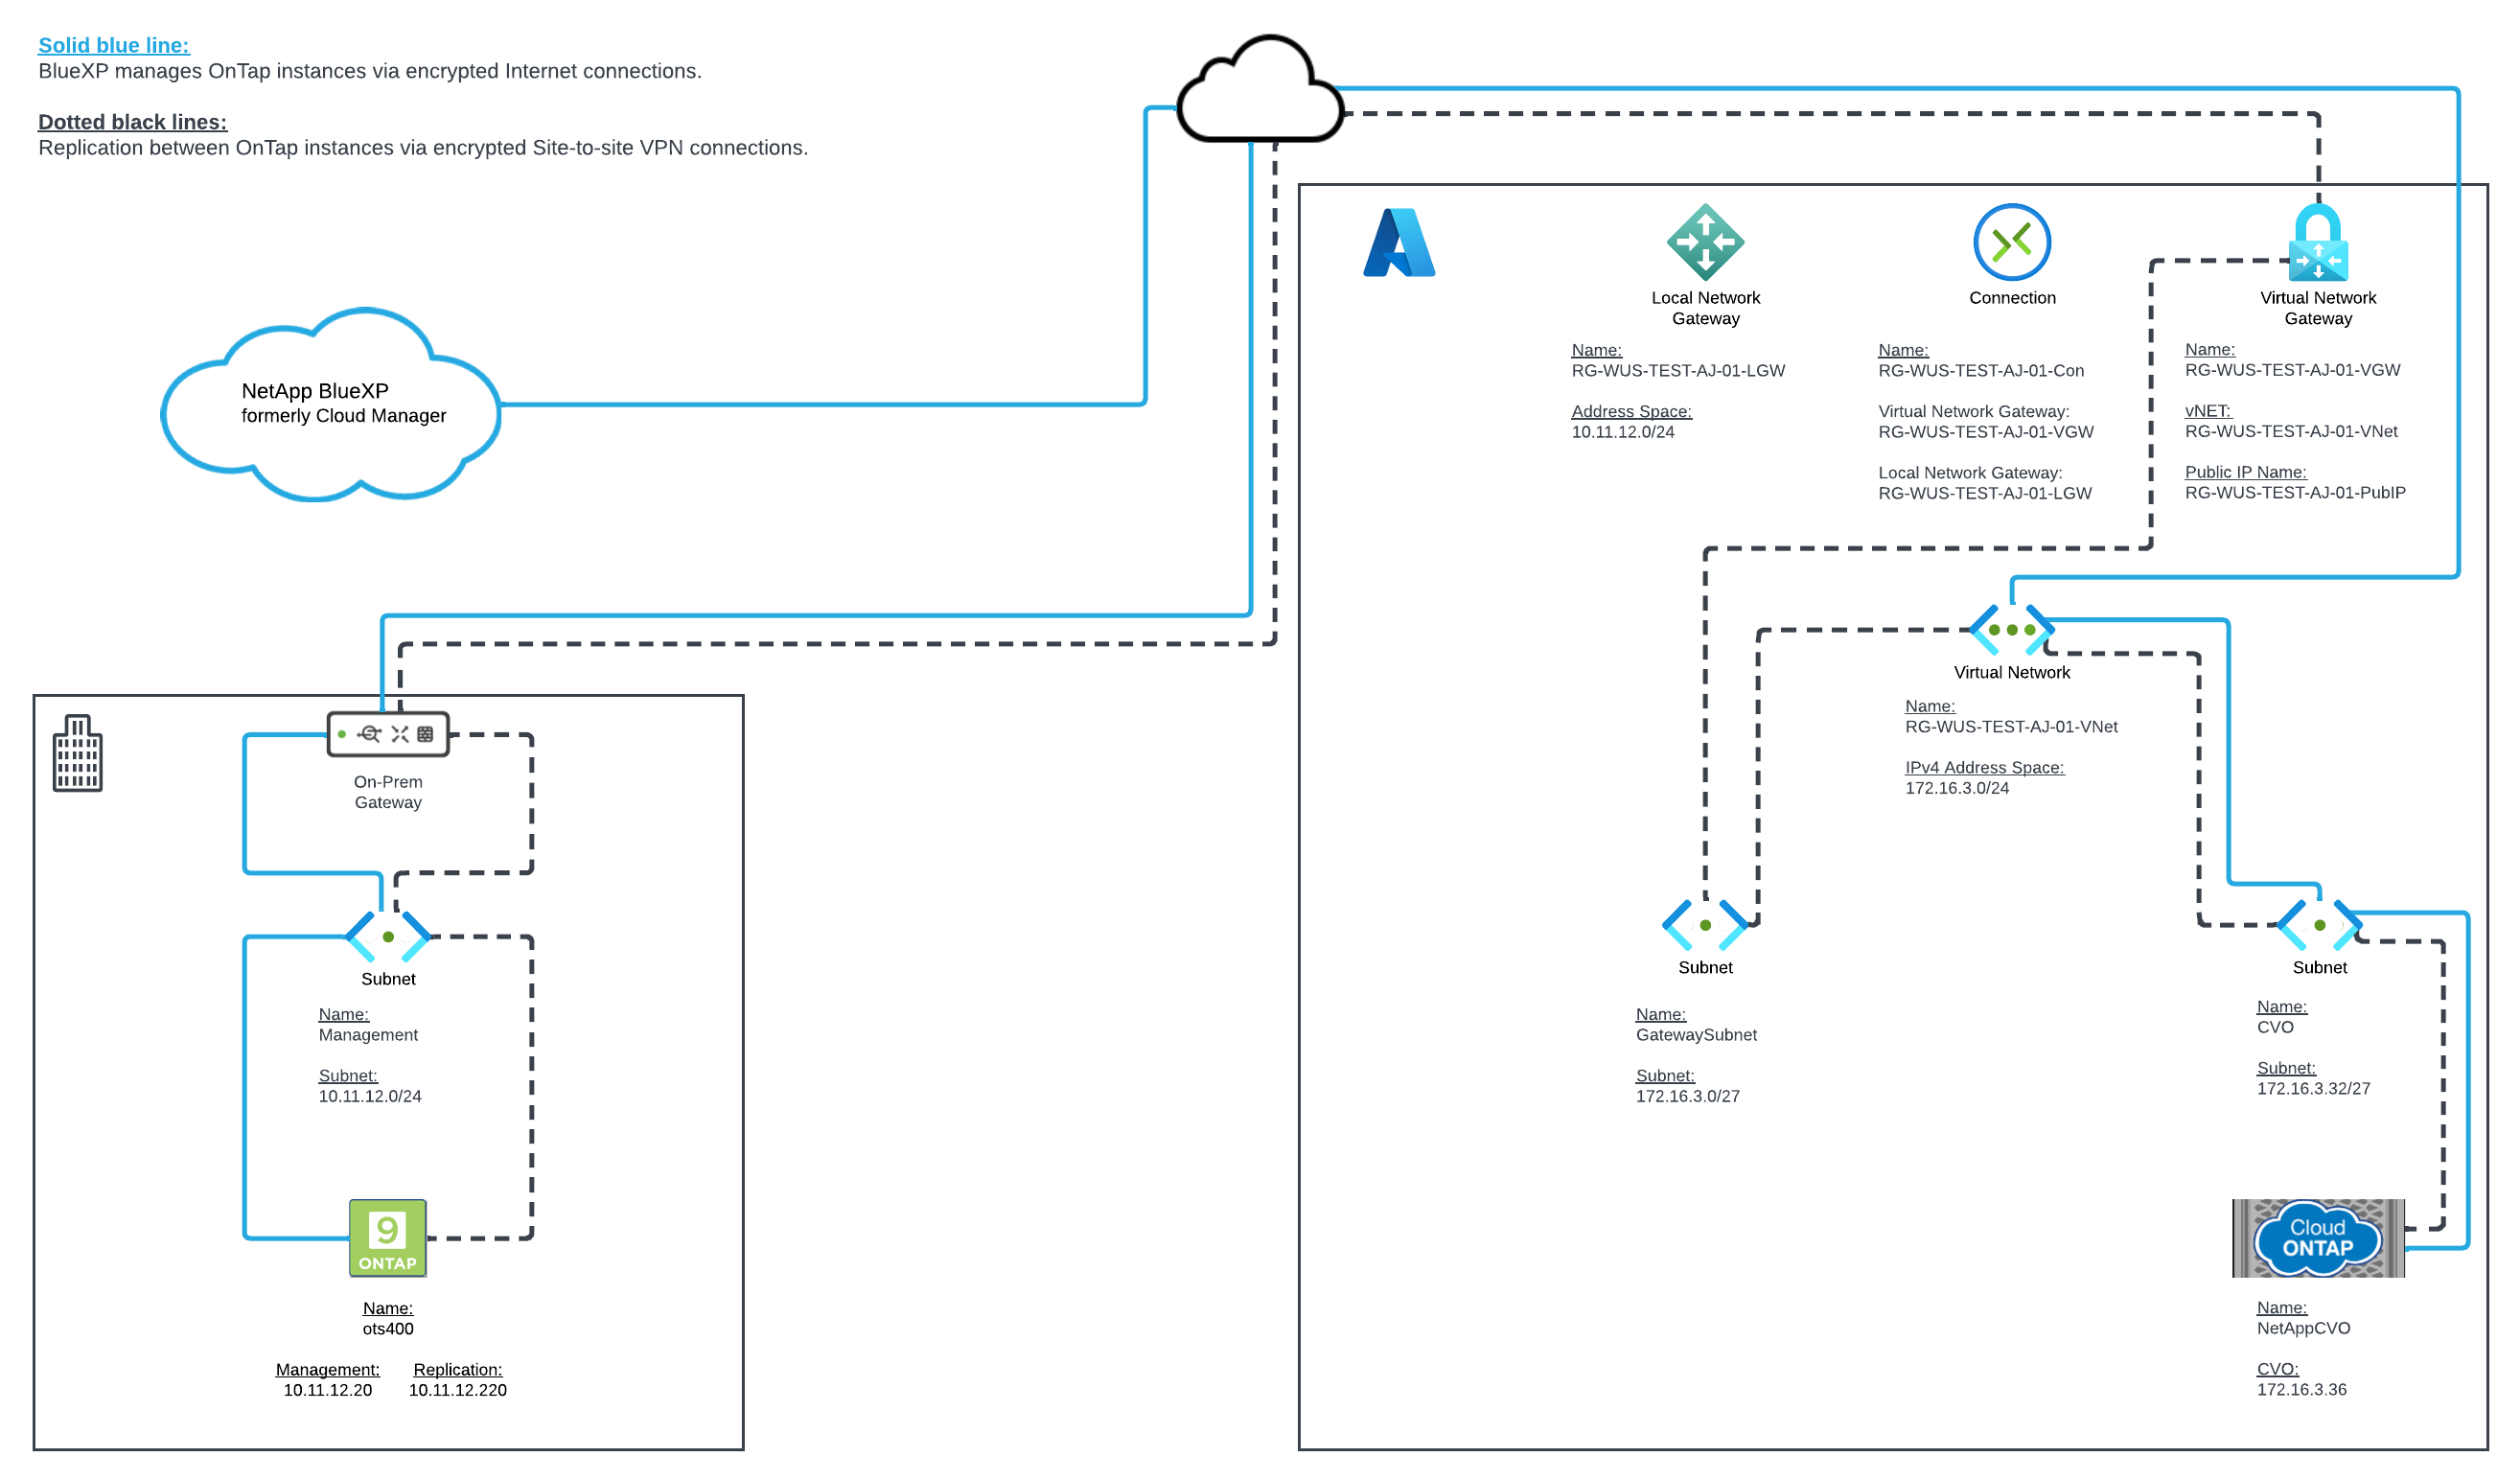
As more and more companies move workloads towards the cloud, having a solid foundation is crucial (security / network connectivity). While there are several ways to connect your on-premises environment or, in my case, a lab to Azure. This blog post will show you how to use the Azure portal to create an Azure Site-to-Site VPN connection from an on-premises network to an Azure vNet.
I will use a Site-to-Site VPN to connect my on-premises lab networks to my Azure virtual networks over an IPsec tunnel. Azure recommends a validated VPN device located on-premises that has an externally facing public IP address assigned, in my case, this was a Meraki MX security appliance.
You may find a list of validated VPN devices, along with configuration guides for most, at:
https://learn.microsoft.com/en-us/azure/vpn-gateway/vpn-gateway-about-vpn-devices
Azure items in this post:
Resource group: Containers where you deploy Azure resources; virtual machines, storage, databases, etc. You could deploy a three-tier instance in a single resource group to manage all those resources in a single container, or, you could deploy each tier in its own resource group.
- I am deploying all CVO related resources into a single resource group, RG-WUS-TEST-AJ-01. No resource from any other group needs to access the CVO resources, and, no other resources need to be managed along with the CVO resources. Also, once I am done with these resources, I can delete the resource group, which deletes all resources it manages without impacting other resources.
On-prem gateway: This is the security appliance on-premises that will be used for the Site-to-site VPN.
On-prem subnets: These are the private IP address ranges on-premises you want to communicate with Azure VNets.
Local Network Gateway: This represents your on-prem networks to Azure for routing purposes only.
Virtual Network Gateway: This will establish the Site-to-site VPN with your on-prem gateway.
Connection: This is the IPsec configuration your Virtual Network Gateway will use to establish a tunnel with your on-prem gateway.
Variables we used throughout this post:
| On-prem: | Virtual Network Gateway, cont’d: | ||
| Public IP address | <on-prem public IP address> | VPN type | Route-based |
| Subnet 1 | 10.11.12.0/24 | SKU | Basic |
| Azure: | Generation | Generation1 | |
| Resource group: | Public IP address | Create new | |
| Subscription | Microsoft Partner Network | Public IP address name | RG-WUS-TEST-AJ-01-PubIP |
| Name | RG-WUS-TEST-AJ-01 | Local Network Gateway: | |
| Region | West US | Name | RG-WUS-TEST-AJ-01-LGW |
| Virtual Network: | Endpoint | IP address | |
| Name | RG-WUS-TEST-AJ-01-VNet | IP address | <on-prem public IP address> |
| IPv4 Address space | 172.16.3.0/24 | Address Space | 10.11.12.0/24 |
| Subnet 1 – Name | GatewaySubnet | Connection: | |
| Subnet 1- Range | 172.16.3.0/27 | Name | RG-WUS-TEST-AJ-01-VGW-Con |
| Virtual Network Gateway: | Connection type | Site-to-site (IPsec) | |
| Name | RG-WUS-TEST-AJ-01-VGW | Shared key (PSK) | <pre-shared key> |
| Gateway type | VPN | IKE Protocol | IKEv2 |
Configuration:
- Resource Group.
- Virtual Network.
- Virtual Network Gateway.
- Local Network Gateway.
- Connection.
- Non-Meraki VPN Peer.
- From a browser, navigate to the Azure portal and sign in with your Azure account.
- Click “Resource groups”
- You may also search for “Resource groups” in your Azure search bar at the top of the portal page.

- Click “+ Create”.

- Enter the options for your Resource Group:
- Subscription hosting your resources.
- Microsoft Partner Network.
- Name of your resource group.
- RG-WUS-TEST-AJ-01.
- Region where your resources will be hosted.
- West US.
- Subscription hosting your resources.

- Click “Review + create”.

- Click “Create”, upon passing validation.

- Click on your newly created Resource Group.

- Click “+ Create”.

- Search for, and then click on, “Virtual network” search result.

- Click “Virtual network”.

- Click “Create”.

- Enter the options for your Virtual Network:
- Subscription hosting your resources.
- Microsoft Partner Network.
- Name of your resource group.
- RG-WUS-TEST-AJ-01.
- Name of your Virtual Network.
- RG-WUS-TEST-AJ-01-vNET.
- Region where your resources are hosted.
- West US.
- Subscription hosting your resources.

- Click “Next: IP Addresses >”.

- Click “…”.

- Click “Delete address space”.

- Click “Add an IP address space”.

- Enter the options for your “IP address space”.
- Starting address.
- 172.16.3.0.
- Address space size.
- /24 (256 addresses).
- Starting address.

- Click “Add”.

- Click “+ Add a subnet”.

- Enter your “Subnet” details.
- IP address space.
- 172.16.3.0/24.
- Subnet template.
- Virtual Network Gateway.
- Starting address.
- 172.16.3.0.
- Subnet size.
- /27 (32 addresses).
- IP address space.

- Click “Add”.

- Click “Review + create”.

- Click “Create”.

- Click on the link for your Resource Group to continue with the creation of a Virtual Network Gateway.

Create a Virtual Network Gateway:
- Click “+ Create”.

- Search for, and click on, “Virtual Network Gateway” search result.

- Click “Virtual network gateway”.

- Click “Create”.

- Enter the options for your Virtual Network Gateway:
- Subscription hosting your resources.
- Microsoft Partner Network.
- Name of your resource group.
- RG-WUS-TEST-AJ-01.
- Name of your Virtual Network Gateway.
- RG-WUS-TEST-AJ-01-VGW.
- Region where your resources are hosted.
- West US.
- Gateway type.
- VPN.
- VPN type.
- Route-based.
- SKU.
- Basic.
- Generation.
- Generation1.
- Name of your Virtual Network.
- RG-WUS-TEST-AJ-01-VNet.
- Subnet for your Virtual Network Gateway.
- Required GatewaySubnet.
- Public IP address.
- Create new.
- Public IP address name.
- RG-WUS-TEST-AJ-01-PubIP.
- Subscription hosting your resources.

- Click “Review + create”.

- Click “Create”.

- Click on the link for your Resource Group to continue with the creation of a Local Network Gateway.

Create a Local Network Gateway:
- Click “+ Create”.

- Search for, and click on, “Local network gateway” search result.

- Click “Local network gateway”.

- Click “Create”

- Enter the options for your Local Network Gateway:
- Subscription hosting your resources.
- Microsoft Partner Network.
- Name of your resource group.
- RG-WUS-TEST-AJ-01.
- Region where your resources are hosted.
- West US.
- Name of your Local Network Gateway.
- RG-WUS-TEST-AJ-01-LGW.
- Endpoint.
- IP address.
- IP address.
- <on-prem public IP address>.
- Address Space(s).
- 10.11.12.0/24.
- Subscription hosting your resources.

- Click “Review + create”.

- Click “Create”.

- Click on the link for your Resource Group to continue with the creation of a Connection.

- Click the link for your Virtual Network Gateway.

- Click “Connections”, on the left sidebar.

- Click “+ Add”.

- Enter the options for your Connections:
- Name of your Connection.
- RG-WUS-TEST-AJ-01-Con.
- Connection type.
- Site-to-site (IPsec).
- Virtual Network Gateway.
- RG-WUS-TEST-AJ-01-VGW.
- Local Network Gateway.
- RG-WUS-TEST-AJ-01-LGW.
- Shared key (PSK).
- <pre-shared key>.
- Name of your Connection.

- Click “OK”.

Configure Non-Meraki VPN Peer:
- Click on your newly created Connection.

- Make a note of the public IP address of your Virtual Network Gateway

- Open a new browser tab, navigate to the Meraki Dashboard and sign in with your Meraki account.
- Navigate to the Site-to-site VPN page, for the network you want to connect to Azure.

- Click “Add a peer”.

- Enter your Azure information.
- Name.
- RG-WUS-TEST-AJ-01.
- IKE Version.
- IKEv2.
- IPsec policies.
- Azure.
- Public IP.
- <public IP address of the Virtual Network Gateway>.
- Private subnets.
- 172.16.3.0/24.
- Preshared secret.
- <pre-shared key>.
- Availability.
- All networks.
- Name.

- Navigate to the VPN status page, for the network you want to connect to Azure.

- Click on the “Non-Meraki peer” tab, to check status.

- Return to your Azure portal tab, on the Connection page, to check status.
- This may take longer than the Meraki status page to show connected.

The End!